diff options
Diffstat (limited to 'README.md')
| -rw-r--r-- | README.md | 14 |
1 files changed, 10 insertions, 4 deletions
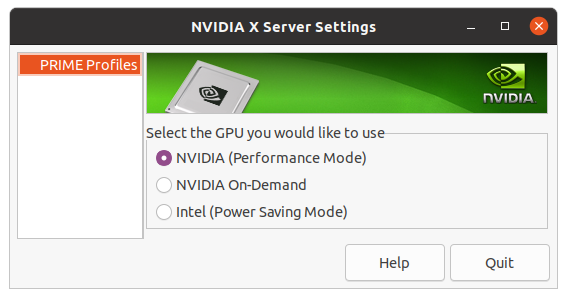
@@ -6,8 +6,8 @@ This screen recorder can be used for recording your desktop offline, for live st where only the last few seconds are saved. ## Note -This software works only on x11.\ -If you are using a variable refresh rate monitor, then choose to record "screen-direct". This will allow variable refresh rate to work when recording fullscreen applications. Note that some applications such as mpv will not work in fullscreen mode. A fix is being developed for this.\ +This software works only on x11 and with an nvidia gpu.\ +If you are using a variable refresh rate monitor then choose to record "screen-direct". This will allow variable refresh rate to work when recording fullscreen applications. Note that some applications such as mpv will not work in fullscreen mode. A fix is being developed for this.\ For screen capture to work with PRIME (laptops with a nvidia gpu), you must set the primary GPU to use your dedicated nvidia graphics card. You can do this by selecting "NVIDIA (Performance Mode) in nvidia settings:\ \ and then rebooting your laptop. @@ -16,12 +16,18 @@ screen-direct capture has been temporary disabled as it causes issues with stutt # Performance When recording Legend of Zelda Breath of the Wild at 4k, fps drops from 30 to 7 when using OBS Studio + nvenc, however when using this screen recorder the fps remains at 30.\ -When recording GTA V at 4k on highest settings, fps drops from 60 to 23 when using obs-nvfbc + nvenc, however when using this screen recorder the fps only drops to 55. The quality is also much better when using gpu-screen-recorder.\ +When recording GTA V at 4k on highest settings, fps drops from 60 to 23 when using obs-nvfbc + nvenc, however when using this screen recorder the fps only drops to 58. The quality is also much better when using gpu-screen-recorder.\ It is recommended to save the video to a SSD because of the large file size, which a slow HDD might not be fast enough to handle. +## Note about optimal performance on NVIDIA +NVIDIA driver has a "feature" (read: bug) where it will downclock memory transfer rate when a program uses cuda, such as GPU Screen Recorder. To work around this bug, GPU Screen Recorder can overclock your GPU memory transfer rate to it's normal optimal level.\ +To enable overclocking for optimal performance use the `-oc` option when running GPU Screen Recorder. You also need to have "Coolbits" NVIDIA X setting set to "12". This setting is automatically installed if you run the install script (`install.sh` or `install_ubuntu.sh`), however if you use flatpak then you need to manually run `install_coolbits.sh` and then reboot your computer.\ +Note that this only works when Xorg server is running as root, and using this option will only give you a performance boost if the game you are recording is bottlenecked by your GPU.\ +Obs! use at your own risk! # Installation If you are running an Arch Linux based distro, then you can find gpu screen recorder on aur under the name gpu-screen-recorder-git (`yay -S gpu-screen-recorder-git`).\ If you are running an Ubuntu based distro then run `install_ubuntu.sh` as root: `sudo ./install_ubuntu.sh`. You also need to install the `libnvidia-compute` version that fits your nvidia driver to install libcuda.so to run gpu-screen-recorder and `libnvidia-fbc.so.1` when using nvfbc. But it's recommended that you use the flatpak version of gpu-screen-recorder if you use an older version of ubuntu as the ffmpeg version will be old and wont support the best quality options.\ +Note that if you use the flatpak version then you wont be able to use overclocking unless you set "Coolbits" NVIDIA X setting (which you can do by running `install_coolbits.sh` and then rebooting).\ If you are running another distro then you can run `install.sh` as root: `sudo ./install.sh`, but you need to manually install the dependencies, as described below.\ You can also install gpu screen recorder ([the gtk gui version](https://git.dec05eba.com/gpu-screen-recorder-gtk/)) from [flathub](https://flathub.org/apps/details/com.dec05eba.gpu_screen_recorder). @@ -29,7 +35,7 @@ You can also install gpu screen recorder ([the gtk gui version](https://git.dec0 ## AMD/Intel `libglvnd (which provides libgl and libegl), mesa, ffmpeg (libavcodec, libavformat, libavutil, libswresample, libavfilter), libx11, libxcomposite, libpulse, libva.so`. ## NVIDIA -`libglvnd (which provides libgl and libegl), ffmpeg (libavcodec, libavformat, libavutil, libswresample, libavfilter), libx11, libxcomposite, libpulse, libcuda.so`. Additionally, you need to have `libnvidia-fbc.so.1` installed when using nvfbc. +`libglvnd (which provides libgl and libegl), ffmpeg (libavcodec, libavformat, libavutil, libswresample, libavfilter), libx11, libxcomposite, libpulse, libcuda.so`. Additionally, you need to have `libnvidia-fbc.so.1` installed when using nvfbc and `libXNVCtrl.so.0` when using the `-oc` option. # How to use Run `scripts/interactive.sh` or run gpu-screen-recorder directly, for example: `gpu-screen-recorder -w $(xdotool selectwindow) -c mp4 -f 60 -a "$(pactl get-default-sink).monitor" -o test_video.mp4` then stop the screen recorder with Ctrl+C, which will also save the recording. You can change -w to -w screen if you want to record all monitors or if you want to record a specific monitor then you can use -w monitor-name, for example -w HDMI-0 (use xrandr command to find the name of your monitor. The name can also be found in your desktop environments display settings).\ |
